This is my first blog and blogger is really the best tool for beginners who want to create a blog.
But as i blogged more and more, I felt blogger is inadequate to meet my needs and hence I decided to switch here
If you are a blogger user, i recommend you to try wordpress.com to host your blog.
I've a small writeup which might be helpful to you.
Anyway, thanks for reading my blog and providing your valuable comments.
You are most welcome to read my new blog.
Thank you once again.
Friday, March 7, 2008
Tuesday, March 4, 2008
Resize/create windows partitions safely
You are running windows, and you have one or few partitions.
Sometime back, you feel that your "C" drive is running out of space or your "F" drive has simply too much space.
To put it simple, you want to partition your harddisk which is running windows.
Well, there are many free and commercial tools out there which might help your cause. Spell partition and immediately "Partition Magic" will come into your mind. I've used Partition Magic and I must admit that it's a very good tool. It helps you to safely create new partitions, resize existing partitions, delete unwanted partitions etc.
But Partition Magic is an expensive tool which most of us cannot afford. (Atleast for personal use). Is there any alternative for Partition Magic which can safely do all the jobs or atleast some of the jobs that that Partition Magic do?
Well, you need to meet a friend here from unexpected quarters. Yes, it's linux. You might think, "How can linux help me in anyway to partition my hard disk?. I use windows and I don't want to install linux".
The answer is, you can partition your hard disk without disturbing windows and without installing linux.
And your companion here is Ubuntu linux. However you have two options before proceeding further:
- get free ubuntu livecd from ubuntu site
- if you are impatient, download ubuntu for free from ubuntu site and burn it to a cd yourself. (Please follow the instructions about how to write ubuntu "iso" image to a cd from ubuntu website)
Once you have the "live cd" in your hands, partitioning your hard disk is just a matter of inserting the "live cd" into your cd drive!!!
Step 1:
Ubuntu "Live CD" is nothing but a "real" operating system in a cd rom. To use it, you must configure your "boot sequence" (normally by pressing "F2" key when you machine starts). Configure your "boot sequence", so that your system attempts to "boot from cd" first, if there is any bootable cd in your cd drive.
Once you did this, insert the Ubuntu "Live CD" into your cd rom and start your machine. Ubuntu "Live CD" will not boot and will show you a startup screen with some options. Don't worry, select the option "Install Ubuntu in safe graphics mode" and press "enter".
Now you can see a "live" ubuntu desktop. (This might take some time, so please wait.)
Step 2:
Click the menu "System -> Administration -> Partition Editor" from the top most taskbar. This will open the ubuntu partion editor application. Some of you might find it similar to Partition Magic.
Sunday, March 2, 2008
Creating tamil word documents without spending a penny
Last week, one of my church member asked my help to translate an english document to tamil. Eventhough I had no experience in any kind of tamil typing whatsoever, I accepted that offer to try something.
Quite some time back, I blogged about Google transliteration tool which is available online.I thought of trying it for this activity.
Google transliteration helps you to type in english and transliterate into tamil. (Please note that it's not translation).
I did the translation myself with the help of some online english to tamil dictionaries.
And finally, I needed some formatting and suddenly Google Docs came to my mind. What more, Google Docs helps you to even share your online document.
And Google Docs also provides option to export your document into formats like pdf, msword, openoffice etc..
With these tools, you can create decent looking tamil documents.
(Please note that google transliteration uses unicode characters)
Resources:
Google Transliteration
Google Docs
English to Tamil Dictionary
Monday, February 25, 2008
Some basic linux (ubuntu) commands for windows user
1. Create a directory
Windows: mkdir
Linux: mkdir
2. Remove a directory
Windows: rmdir
Linux: rmdir
3. Change to a directory
Windows: cd
Linux: cd
4. Change to a previous directory
Windows: cd..
Linux: cd ..(note one space between "cd" and "..")
5. List content of a directory
Windows: dir
Linux: ls, dir
6. Copy file
Windows: copy
Linux: cp
7. Remove file(s)
Windows: del
Linux: rm
8. Clear the content in command shell
Windows: cls
Linux: clear
9. Display network connection details
Windows: ipconfig
Linux: ifconfig
10. Check connectivity to a machine
Windows: ping
Linux: ping
Note:
The windows os referred here is windows xp
The linux os referred here is ubuntu-7.10
Can you do this in Windows?
Today i happened to use the ubuntu calculator application to do some minor calculation.
I was trying to calculate the size of a file in megabytes.(which i intended to download)
This is what i wanted to calculate:
496890302/(1024*1024)
Normally, in windows, I use to do something like this:
1. Type 496890302
2. Type/press "/"
3. Type 1024
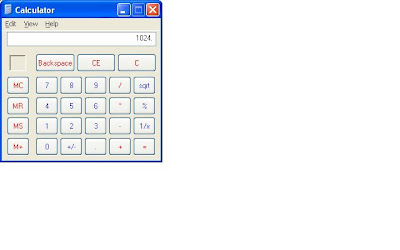
4. Type/press "/"
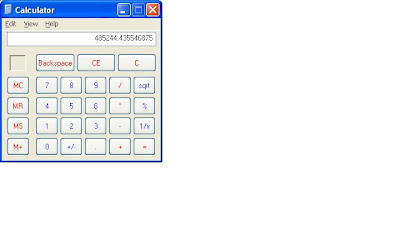
5. Type 1024
6. Type/press "="

Ooohhh...
6 steps for a simple operation....!!
And how about this...?
Step 1:
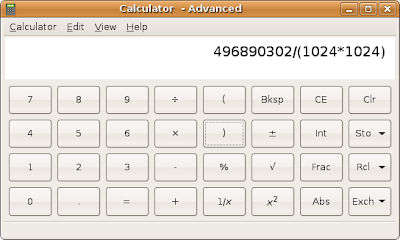
Step 2: Type/press "="

Unknowingly, I've been doing this many times so far in windows. What a waste of time..?
NOTE:
And one more thing..
When you take a screenshot in windows (by pressing alt+printscreen), it's just copied to clipboard. Then you need to open an application like "Paint" or "IrfanView" to save the screenshot to a file. And the default format used by "Paint" (in my case) is "bmp". Because of that, the size of the 4 windows calculator screenshots i posted above is about 2.9 MB.
When you take a screenshot in ubuntu (by pressing alt+printscreen), it prompts you to save the screenshot to a file. And it uses the "png" format to save the screenshots. As a result, the 2 ubuntu-calculator screenshots i posted above are about 45 KB only.
(Yes, it's true that if I save using "png" format in windows by using some good tools like IrfanView, then i can get reduced file size. But in this post, i tried to explain the default behaviour of both operating systems)
Sunday, February 24, 2008
Installing NetBeans 6.0 on Ubuntu-7.10
I followed the instructions mentioned in this NetBeans Wiki to install NB 6.0 on my ubuntu.
But I feel some more information can be added to this wiki.
For example, when i ran the command "
The problem here is that the package sun-java6-jdk is available in the ubuntu "multiverse" repository which is disabled by default.
In ubuntu, the repositories are defined in the file "/etc/apt/sources.list". Take a backup of this file, in case if you want.
Now open this file and uncomment the lines which define the "universe" and "multiverse" respoitories.
It should look something like this now:
The job is not done yet.
Run the command "
The process might take some time. Wait patiently.
Once the update is done, ensure that the "sun-java6-jdk" package is available in the repositories, by issuing the command "
Now we are rest assured that our desired packages are available.
Now run the commmand "
Then just follow the instructions to complete the installation.
In the meanwhile, don't forget to download the "netbeans 6.0" installer from netbeans.org. Once you downloaded the installer, you can run it by navigating to the appropriate folder.
In my case, i needed to issue the following command:
This will invoke the netbeans installer and just follow the instructions to complete the installation process.
That's it, netbeans will install itself smootly on your machine.
But I feel some more information can be added to this wiki.
For example, when i ran the command "
sudo apt-get install sun-java6-jdk", ubuntu complained to me that this package is not found in its repositories.The problem here is that the package sun-java6-jdk is available in the ubuntu "multiverse" repository which is disabled by default.
In ubuntu, the repositories are defined in the file "/etc/apt/sources.list". Take a backup of this file, in case if you want.
Now open this file and uncomment the lines which define the "universe" and "multiverse" respoitories.
It should look something like this now:
# Line commented out by installer because it failed to verify:
deb http://us.archive.ubuntu.com/ubuntu/ gutsy universe
# Line commented out by installer because it failed to verify:
deb-src http://us.archive.ubuntu.com/ubuntu/ gutsy universe
# Line commented out by installer because it failed to verify:
deb http://us.archive.ubuntu.com/ubuntu/ gutsy-updates universe
# Line commented out by installer because it failed to verify:
deb-src http://us.archive.ubuntu.com/ubuntu/ gutsy-updates universe

## N.B. software from this repository is ENTIRELY UNSUPPORTED by the Ubuntu
## team, and may not be under a free licence. Please satisfy yourself as to
## your rights to use the software. Also, please note that software in
## multiverse WILL NOT receive any review or updates from the Ubuntu
## security team.
# Line commented out by installer because it failed to verify:
deb http://us.archive.ubuntu.com/ubuntu/ gutsy multiverse
# Line commented out by installer because it failed to verify:
deb-src http://us.archive.ubuntu.com/ubuntu/ gutsy multiverse
# Line commented out by installer because it failed to verify:
deb http://us.archive.ubuntu.com/ubuntu/ gutsy-updates multiverse
# Line commented out by installer because it failed to verify:
deb-src http://us.archive.ubuntu.com/ubuntu/ gutsy-updates multiverse
The job is not done yet.
Run the command "
sudo apt-get update" in the terminal to instruct ubuntu to update the package details w.r.t the repositories we enabled just now.The process might take some time. Wait patiently.
Once the update is done, ensure that the "sun-java6-jdk" package is available in the repositories, by issuing the command "
apt-cache search sun-java6-jdk". You might get something like this in the terminal window:
james@kuttima-gifty:/etc/apt$ apt-cache search sun-java6-jdk
sun-java6-bin - Sun Java(TM) Runtime Environment (JRE) 6 (architecture dependent files)
sun-java6-jdk - Sun Java(TM) Development Kit (JDK) 6
sun-java6-jre - Sun Java(TM) Runtime Environment (JRE) 6 (architecture independent files)
Now we are rest assured that our desired packages are available.
Now run the commmand "
sudo apt-get install sun-java6-jdk" in the terminal. Depending on your connection speed, this might take quite some time.Then just follow the instructions to complete the installation.
In the meanwhile, don't forget to download the "netbeans 6.0" installer from netbeans.org. Once you downloaded the installer, you can run it by navigating to the appropriate folder.
In my case, i needed to issue the following command:
sudo sh netbeans-6.0.1-ml-javaee-linux.sh
This will invoke the netbeans installer and just follow the instructions to complete the installation process.
That's it, netbeans will install itself smootly on your machine.
Friday, February 22, 2008
Installing VirtualBox guest additions in OpenSuse
I managed to install the VirtualBox guest additions for ubuntu without any problem. And as a result, I get some excellent features like "seamless mouse integration", shared folder access etc, between my host (windows xp) and guest (ubuntu).
But when I tried to do the same for OpenSuse, I got into problem. I couldn't run the VBoxLinuxAdditions.run from the terminal. I received an error messaage saying that "Please install GNU make, Please install GNU compiler".
Then when I searched the web, I found this link quite useful.
As such, I executed this command in the OpenSuse terminal:
It asked for my "root" password, and when i entered, it downloaded the necessary packages. (Though, i received an information that autoconf cannot be installed)
It took nearly 1 hour to download and install the necessary packages on my machine.
Then I ran the command:
after navigating to the appropriate "media" directory.
Then I was notified to restart the OS. And after that, I was able to use all the features I use with "ubuntu" as guest.
I also noticed that my OpenSuse resolution automatically increased to 1024x768 after installing the VirtualBox guest additions. (It was previously 800x600 only)
But when I tried to do the same for OpenSuse, I got into problem. I couldn't run the VBoxLinuxAdditions.run from the terminal. I received an error messaage saying that "Please install GNU make, Please install GNU compiler".
Then when I searched the web, I found this link quite useful.
As such, I executed this command in the OpenSuse terminal:
sudo zypper install gcc make automake autoconf kernel-source
It asked for my "root" password, and when i entered, it downloaded the necessary packages. (Though, i received an information that autoconf cannot be installed)
It took nearly 1 hour to download and install the necessary packages on my machine.
Then I ran the command:
sudo sh VBoxLinuxAdditions.run
after navigating to the appropriate "media" directory.
Then I was notified to restart the OS. And after that, I was able to use all the features I use with "ubuntu" as guest.
I also noticed that my OpenSuse resolution automatically increased to 1024x768 after installing the VirtualBox guest additions. (It was previously 800x600 only)
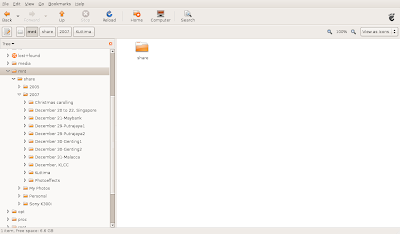
Sharing Windows XP folder with Ubuntu
Since i'm new to ubuntu, all my files were basically residing in windows xp.
As i was working with ubuntu, i thought of relaxing a bit by viewing some photos taken recently. But all of them were sitting inside my xp and i need some way to access it.
Transferring them via usb is an option, but i wanted an even elegant solution. Then i came to know that VirtualBox supports "sharing" folders between "host" and "guest" operating systems.
I read in the VirtualBox manual, that "sharing" folders between "windows" host and "windows" guest is more or less seamless. But "sharing" between "windows" host and "linux" guest need some additional work.
But it's not very tough.
First i needed to configure the shared folder in my VirtualBox. I clicked the menu "Devices->Shared Folders" to configure the sharing. And I choose a folder in my xp machine and gave a share name to that.
Then i opened the terminal in ubuntu and created a directory called share under "mnt" so it looks as "/mnt/share". This required "admin" privileges.
Then i executed the command: sudo mount -t vboxsf myphotos /mnt/share
in the terminal. That's it.
And this how it looked after that in the FileBrowser:

Best applications in Ubuntu-7.10
Though there are some very good applications integrated in the default ubuntu installation, these are the one which i love most (as of now):
- GParted (Undoubtedly very very good. Extremely powerful. I use the GParted in the ubuntu livecd to resize/partition even my windows xp drives)
- Tomboy notes (Very handy, something like the "Scratchpad" in Google Desktop)
- Calculator (Really amazing, the calculator in windows xp looks very ugly to me now)
Increasing the screen resolution of Ubuntu-7.10 on VirtualBox
Oops...finally i managed to configure my ubuntu screen resolution to the fullest.
I have a Dell Vostro 1400 laptop with Windows xp professional. Ubuntu runs on my machine on top of VirtualBox.
But I never enjoyed working with ubuntu, since all i was able to view the ubuntu desktop at the resolution "800x600" only.
After searching through the web, I finally managed to get the full resolution supported by my notebook. (1280x800).
These are steps i followed:
- installed the virtual machine add-ons provided by VirtualBox
- opened the /etc/X11/xorg.conf file and added the the resolutions "1280x800" and "1024x768" under the "Screen" section...
So here is how my xorg.conf file looks now...
----------------------------------------------------------------------------------------------
# xorg.conf (xorg X Window System server configuration file)
#
# This file was generated by dexconf, the Debian X Configuration tool, using
# values from the debconf database.
#
# Edit this file with caution, and see the xorg.conf manual page.
# (Type "man xorg.conf" at the shell prompt.)
#
# This file is automatically updated on xserver-xorg package upgrades *only*
# if it has not been modified since the last upgrade of the xserver-xorg
# package.
#
# If you have edited this file but would like it to be automatically updated
# again, run the following command:
# sudo dpkg-reconfigure -phigh xserver-xorg
Section "Files"
EndSection
Section "InputDevice"
Identifier "Generic Keyboard"
Driver "kbd"
Option "CoreKeyboard"
Option "XkbRules" "xorg"
Option "XkbModel" "pc105"
Option "XkbLayout" "us"
EndSection
Section "InputDevice"
Identifier "Configured Mouse"
Driver "vboxmouse"
Option "CorePointer"
Option "Device" "/dev/input/mice"
Option "Protocol" "ImPS/2"
Option "ZAxisMapping" "4 5"
Option "Emulate3Buttons" "true"
EndSection
Section "InputDevice"
Identifier "Synaptics Touchpad"
Driver "synaptics"
Option "Device" "/dev/psaux"
Option "Protocol" "auto-dev"
Option "HorizEdgeScroll" "0"
EndSection
Section "InputDevice"
Driver "wacom"
Identifier "stylus"
Option "Device" "/dev/input/wacom"
Option "Type" "stylus"
Option "ForceDevice" "ISDV4" # Tablet PC ONLY
EndSection
Section "InputDevice"
Driver "wacom"
Identifier "eraser"
Option "Device" "/dev/input/wacom"
Option "Type" "eraser"
Option "ForceDevice" "ISDV4" # Tablet PC ONLY
EndSection
Section "InputDevice"
Driver "wacom"
Identifier "cursor"
Option "Device" "/dev/input/wacom"
Option "Type" "cursor"
Option "ForceDevice" "ISDV4" # Tablet PC ONLY
EndSection
Section "Device"
Identifier "Generic Video Card"
Driver "vboxvideo"
BusID "PCI:0:2:0"
EndSection
Section "Monitor"
Identifier "Generic Monitor"
Option "DPMS"
EndSection
Section "Screen"
Identifier "Default Screen"
Device "Generic Video Card"
Monitor "Generic Monitor"
DefaultDepth 24
SubSection "Display"
Modes "1280x800" "1024x768" "800x600"
EndSubSection
EndSection
Section "ServerLayout"
Identifier "Default Layout"
Screen "Default Screen"
InputDevice "Generic Keyboard"
InputDevice "Configured Mouse"
# Uncomment if you have a wacom tablet
# InputDevice "stylus" "SendCoreEvents"
# InputDevice "cursor" "SendCoreEvents"
# InputDevice "eraser" "SendCoreEvents"
InputDevice "Synaptics Touchpad"
EndSection
-------------------------------------------------------------------------------------------
And the only change i made was here:
Section "Screen"
Identifier "Default Screen"
Device "Generic Video Card"
Monitor "Generic Monitor"
DefaultDepth 24
SubSection "Display"
Modes "1280x800" "1024x768" "800x600"
EndSubSection
EndSection
I just added "1280x800" "1024x768" under the SubSection "Display".
Fortunately this worked for me.
(Note: I actually got this information from a VirtualBox forum thread and I sincerely thank the guy who provided this information. Thank you very much really)
Whatmore, if you choose the "Full screen mode" in VirtualBox, you get a feeling of just running ubuntu...
Ya, now i feel, i can slowly leave behind windows xp behind me...
Thursday, February 21, 2008
Fedora 8 added to my Linux armour
First ubuntu, then open suse, now fedora....
Yes, now I have Fedora 8 installed on my machine, courtesy VirtualBox.
One interesting thing is they all have a fairly similar user interface. And all the three look very promising and very interesting.
Interesting times ahead...
(I would like to explore solaris next. If you have installed solaris on top of VirtualBox, please offer your suggestions to me)
Control System and source code quality
Sun and other pioneers have done a great job in defining some code conventions and best practices for java development. We all know that it would be easy to maintain our java codes, if we follow these conventions and best practices.
A basic rule in Control Systems is, if you want to control some process, you need the feedback signal, so that you can regulate it.
Say, you press the accelerator in your car. You would like to know at what speed you are driving, by looking at the speedometer. Then you would like to cruise often having a look at your speedometer to control your driving speed.
So, you need some device/instrument, here in this case a speedometer, to monitor/control some process.
(Needless to say that i'm an electronics and instrumentation graduate :)
Likewise, to control the quality of your code, you need some device/instrument to give you feedback/measurement of the quality of code, so that you can take actions based on it.
It's one thing to say to your team members, "Guys, the source code you write must follow the code conventions we have defined" and not enforcing a way to monitor it.
CheckStyle is one such tool to aid you in controlling the quality of your code. CheckStyle defines a set of "rules", which must be followed by the source code.
The rules are very simple to use and configure. You can configure them in a xml file. An easy way to start learning CheckStyle is to have a look at the sun_checks.xml file that comes along with the downloads.
Rules are defined as "modules". A simple rule regarding the brace position might look like this:
<module name="LeftCurly/>
This rule checks the position of the left curly bracket "{" in your java source. The default position is "end of line", which means:
But if your organization enforce some thing like this:
you can configure CheckStyle to achieve that like this:
<module name="LeftCurly"/>
<property name="option" value="nl">
</module>
Or, if you want to enforce that all your methods must contain javadoc statements, it's very easy to achieve with a simple CheckStyle rule:
<module name="JavadocMethod"/>
To find unused, redundant imports in your java source code, just do this:
<module name="UnusedImports"/>
<module name="RedundantImport"/>
To make things much easy for the developers, CheckStyle offers many types of integration. You can either opt to run it from command line, integrate in your build process using ant/maven or directly integrate it with your IDE of choice.
We use both the IDE integration and the ant integration options.
If you are a NetBeans user, there are two nice plugins available:
1. CheckStyle4nb
2. CheckStyleBeans
The first one can be used to run CheckStyle rules on a java source file, package(s).
The second one integrates deeply into the IDE and marks the CheckStyle rules violations in the left side bar of NetBeans.
I use the first plugin a lot.
As the name implies, CheckStyle is more intended to check the "style", "formatting" of your java source code, though it contains some rules to find out some "bugs" in your code as well.
But finding "bugs" and "logical mistakes" in your source code is not which CheckStyle claims to do. PMD, FindBugs might be the right candidates for that job.
But I can assure you that CheckStyle will definitely make your java source code look better and easy to maintain. Be sure to check it out, if you haven't done so far.
A basic rule in Control Systems is, if you want to control some process, you need the feedback signal, so that you can regulate it.
Say, you press the accelerator in your car. You would like to know at what speed you are driving, by looking at the speedometer. Then you would like to cruise often having a look at your speedometer to control your driving speed.
So, you need some device/instrument, here in this case a speedometer, to monitor/control some process.
(Needless to say that i'm an electronics and instrumentation graduate :)
Likewise, to control the quality of your code, you need some device/instrument to give you feedback/measurement of the quality of code, so that you can take actions based on it.
It's one thing to say to your team members, "Guys, the source code you write must follow the code conventions we have defined" and not enforcing a way to monitor it.
CheckStyle is one such tool to aid you in controlling the quality of your code. CheckStyle defines a set of "rules", which must be followed by the source code.
The rules are very simple to use and configure. You can configure them in a xml file. An easy way to start learning CheckStyle is to have a look at the sun_checks.xml file that comes along with the downloads.
Rules are defined as "modules". A simple rule regarding the brace position might look like this:
<module name="LeftCurly/>
This rule checks the position of the left curly bracket "{" in your java source. The default position is "end of line", which means:
public void myMethod() {
//do something...
}
But if your organization enforce some thing like this:
public void myMethod()
{
//do something...
}
you can configure CheckStyle to achieve that like this:
<module name="LeftCurly"/>
<property name="option" value="nl">
</module>
Or, if you want to enforce that all your methods must contain javadoc statements, it's very easy to achieve with a simple CheckStyle rule:
<module name="JavadocMethod"/>
To find unused, redundant imports in your java source code, just do this:
<module name="UnusedImports"/>
<module name="RedundantImport"/>
To make things much easy for the developers, CheckStyle offers many types of integration. You can either opt to run it from command line, integrate in your build process using ant/maven or directly integrate it with your IDE of choice.
We use both the IDE integration and the ant integration options.
If you are a NetBeans user, there are two nice plugins available:
1. CheckStyle4nb
2. CheckStyleBeans
The first one can be used to run CheckStyle rules on a java source file, package(s).
The second one integrates deeply into the IDE and marks the CheckStyle rules violations in the left side bar of NetBeans.
I use the first plugin a lot.
As the name implies, CheckStyle is more intended to check the "style", "formatting" of your java source code, though it contains some rules to find out some "bugs" in your code as well.
But finding "bugs" and "logical mistakes" in your source code is not which CheckStyle claims to do. PMD, FindBugs might be the right candidates for that job.
But I can assure you that CheckStyle will definitely make your java source code look better and easy to maintain. Be sure to check it out, if you haven't done so far.
Tuesday, February 19, 2008
OpenSuse 10.3 on VirtualBox
Impressed by ubuntu and being helped by VirtualBox, I decided to explore further into the linux world.
So I thought of installing openSuse 10.3 on my VirtualBox. I downloaded the gnome "live cd" (iso image) from opensuse.org. The download size was around 643 MB and it took quite some time to download the image.
Then I started VirtualBox and added a new empty virtual machine named "OpenSuse-10.3" along with the necessary virtual hard disk. I decided to give 8 GB and 512 MB RAM for opensuse.
Then i mounted the downloaded "iso" image to the virtual machines cd drive and started the empty virtual machine. So the open suse live cd booted (much like ubuntu live cd environment) and then i clicked the "install" icon on the live cd's desktop.
To my surprise, the installation was very very fast and amazingly simple. I would say that my opensuse installation experience was better than what I experienced with ubuntu.
Though ubuntu installation is also quite easy and smooth, opensuse installation was like installing a normal windows application. Great work.
I had to make only very few configurations to proceed with the install and the installation took less than 15 minutes.
Then i unmounted the live cd from the virtual cd drive and then restarted the virtual machine.
Wow, opensuse booted up quite beautifully and now it asked for some minor configurations like username and password.
Great. My opensuse installation was completed in notime.
And did you know what was the first activity I did after installing it? Blogged about it.
Ya. I'm writing this blog from within the opensuse running on top of my VirtualBox.
Monday, February 18, 2008
MS Virtual PC vs VirutalBox
Working on ubuntu running on top of Microsoft Virtual PC 2007 started giving me lot of problems. Some of them are:
1. Need lots of tweaking during installation of ubuntu in virtual pc to provide even basic mouse integration. Need to enter additional parameters (i8042.noloop) during boot up and then need to configure some system settings to make the mouse work in ubuntu running under virtual pc.
2. No smooth mouse integration. You need to click inside the virtual operating system for the mouse to be effective inside and need to press "Right Alt" key to come out of virtual os.
3. No mouse scrolling support at all.
4. In a nutshell, virtual pc bothers least about linux environments. No addons, nothing.
So, I started looking for alternatives.
I didn't give much focus to VirtualBox until i read the news about Sun's acquisition about VirtualBox. I respect Sun and their products. So i thought of giving VirtualBox a try.
- Installing ubuntu was smooth.
- No need to tweak any boot options like i did while installing ubuntu on top of virtual pc 2007.
- However i needed to press "Right Ctrl" key to come out of virtual box, initially.
- But, once i installed the "add-ons" for linux, i was amazed at the seamless mouse integration. I could click the firefox icon in windows xp and also on ubuntu on virtualbox (to and fro) without pressing any keys.
- I could scroll my mouse like i can scroll on xp.
- Excellent user interface.
However i have some concerns:
- very small resolution size (800 x 600 against my laptop resolution of 1280 x 780)
- need add-ons to provide usb support.
But overall, I feel that virtualbox is much better than Virtual PC 2007.
I regret for spending much time meddling around with Virtual PC 2007.
The fault is with me, I shouldn't have tried a Microsoft product at first place.
Sunday, February 10, 2008
Designing a small web application using various web frameworks
I'm planning to write a small web application using various web frameworks. This will be useful for anyone who is new to web application development. Also it might help someone to choose the best web framework for their application.
Servlets are the foundation of any web framework, so i'm planning to create the application first using plain servlets and jsp. We will leverage some design patterns and best practices available.
After that i'm planning to design the same application using some popular web frameworks, notably:
- Struts (yes, the same old struts, not struts2)
- JSF
- GWT
- Apache Wicket
I hope this exercise will be helpful to understand and learn these web frameworks.
The ubuntu effect
One thing that i like very much in ubuntu is the simple and slim start menu. In ubuntu the start menu looks very much organized.
For example, when i installed eclipse and netbeans in ubuntu, the shortcuts were automatically created under the start menu item called "Programming".
Whereas, my windows xp startup menu will always drive me mad. It use to grow big whenever i install a new application.
So i thought of following the ubuntu way to organize my windows xp startup menu.
And here is how it looks now:
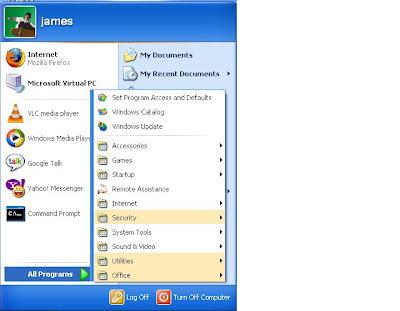
Almost a mimic ubuntu start menu.
My favourite open source applications
My interest towards open source started a long way when i started using Firefox.
Actually I must say that I was forced to use firefox by one of my senior in my company. But it turned out to be an eye opener for me. I've never heard about the advent of open source movement before that. So that firefox was the door through which i entered the open source world.
Wow. There is almost replacement for all the commercial applications we are using in our day to day life in the open source world. Some are more than enough, where as some perform even better than their commercial counterparts.
Here are the list of open source applications i use (in no particular order) in my personal notebook:
- Firefox
- NetBeans
- Eclipse
- MySQL
- Ubuntu (running on virtual pc)
- Openoffice
- VLC Media Player (Just fell in love with this wonderful app)
- PDFGenerator (mainly as a "virtual printer")
- Notepad++
- 7Zip
Since i'm more into programming i haven't explored great apps like GIMP, etc.
Following are the list of proprietary applications i use:
- Microsoft Windows XP Professional
- Microsoft Virtual PC (only for running ubuntu)
- AVG Antivirus (freeware)
- Komodo Firewall (freeware)(too good a product, i wonder how come they give it as freeware)
- Google talk
- Yahoo Messenger
I read some articles about open source alternatives for antivirus & firewall, like WinPooch, Clamdin etc., but i'm still a bit reluctant to use them.
So, I feel i'm almost there.
I can knock off Windows XP, Virtual PC, AVG, Komodo from the list if I move permanently to ubuntu.
Finally i'm left with Google Talk and Yahoo Messenger. I heard about open source replacement called "pidgin" but i'm not sure whether it supports all the functionalities of these applications. (for e.g. viewing webcam, group voice conference etc)
I'm dreaming about the day when everyone will prefer linux over windows and notebooks pre-installed with linux (whether it's ubuntu or fedora or anything else..) outsell their windows counterparts.
And I believe the day is not so far.
Friday, February 8, 2008
Eclipse Vs NetBeans again (on ubuntu)
Though i'm still fighting with ubuntu gusty to get the right screen resolution, i thought of giving my favourite java ides a try on gusty.
On windows, i tend to use netbeans more than eclipse, (mainly because i work with JSF/JPA more as of now)
So i thought of seeing how these 2 friends of mine behave in ubuntu.
I love ubuntu for a lot of reasons. And the most important reason is the ease with which you can install most of the day-to-day applications.
Ubuntu has a wonderful "package manager" (similar to the childish Add/Remove programs in windows). With the synaptic package manager, you can almost install all applications you ever need.
So, i looked for netbeans first and i was bit disappointed to see only netbeans 5.5 in the repository. But i thought of downloading it, because, something is better than nothing, right?.
Downloading and installing netbeans-5.5 is a piece of cake in ubuntu. All we need to do is to open a terminal and type "apt-get install netbeans-5.5". Whoa!
I thought of doing the otherway round, since i feel more comfortable seeing a UI than a command line, so i used the synaptic package manager to download netbeans-5.5.
Smooth. Everything went through fine, until i opened netbeans.
The font rendering was horrible. (May be because i had only jdk 1.5). But i must admit that NetBeans looked really horrible. I couldn't spend much time with it because of the horrible fonts. Though it's a swing issue, it gives really a bad image to netbeans.
Leave alone the font, the look and feel was even more horrible. I just couldn't digest the default "ocean" look and feel. NetBeans looked like "odd man out" in my ubuntu desktop. I felt really sorry for netbeans, because, on windows, it's very difficult for a non-java user to point out netbeans as a java application. But on linux, netbeans looked like an old volkswagon among new sedans like lexus. Pity you netbeans.
So, i thought of trying our beloved friend eclipse. Again installing eclipse was really really easy. No need to go to eclipse.org. Just the ubuntu package manager does the job for you. I really really like ubuntu a lot in this regard.
I started eclipse. Wowwww..It's beautiful man. The fonts were superb and pleasing to the eyes. In the first impression itself, eclipse won my heart eventually. And the look and feel, that's the same as i see in windows. Great job, eclipse team.
I don't know whether it's because of swt or not, but i really gotta love eclipse on ubuntu.
Eclipse is really the winner over netbeans (alteast in ubuntu).
(Note: I'm currently downloading java se 6 and netbeans 6.0. Let's see how well netbeans 6.0 fare)
Saturday, January 19, 2008
Ubuntu-7.10 is now my default operating system
Finally done it.
After many days of reading articles about installing ubuntu alongside windows xp, i finally managed to do it today.
I first heared about ubuntu from a friend who gave me a free ubuntu 5.* cd.
I explored ubuntu then from it's live cd environment and quite liked it.
But i couldn't explore further, as all i had was a laptop given by my office. So i didn't want to risk my job by installing ubuntu (hi hi..). But ever since i bought a notebook this christmas, i just couldn't control myself.
I had a ubuntu-7.04 live cd, but that cd couldn't boot properly in my notebook and i thought of downloading the "iso" cd image and burn it to a cd. That didn't work either (for me, atleast).
Then, i ordered for a free 7.10 live cd and got it last week. Later, as i was reading some articles about installing ubuntu alongside windows, i got afraid that a improper install might corrupt my system.
So, i thought of taking a safer route by installing ubuntu using microsoft virtual pc. So I installed ubuntu using virtual pc. This exercise actually helped to understand a lot of about installing ubuntu in particular.
Later, i thought of making a final attempt of installing ubuntu alongside windows xp. Contrary to my expectations, the installation was much much smoother and simpler than i expected. The installation completed in less than 20 minutes in my case.
Wow....i felt very happy at the end.
Whenever my ubuntu boots up, i see it with a sort of pride.
I will share my installation experience shortly...
Bye for now.
Thursday, January 17, 2008
Sunday, January 13, 2008
Java Web Development with Eclipse 3.3
Hi all,
Blogging after a long....break. I was travelling a lot for the last 1 month or so. I went to Singapore, Putrajaya, Malacca to name a few. And as a result, very little time for blogging.
If you are following my blogs, i blogged sometime back about core java development using netbeans 6.0 and eclipse 3.3.
Both are excellent open source IDEs that have their own strength and weakness.
I've been using both netbeans and eclipse and i'm pleased with both of them generally.
Before the advent of version 6.0, netbeans was not on par with eclipse for core java development. The responsive editor, fast code completion, incremental compiling etc, etc.. were some of the trademark eclipse strongholds which netbeans never managed to enter, leave alone capturing.
But with 6.0, netbeans has made really a very huge stride in the areas which where it's traditional letoffs.
Eclipse 3.3 has also made some huge improvements in many areas, like it's support for Java EE 5 development, etc.
I also heard that the WTP project in eclipse has improved a lot over these days, so i thought of giving it a try.
My environment:
Eclipse 3.3 Europa
JDK 1.6.0_03
Tomcat 6.0
So i thought of refreshing my servlet/jsp/jsp-el/jstl skills in the above mentioned environment.
One thing that impressed me is that eclipse, by default, supports many popular application servers/web containers than netbeans does.
There is support for all versions of tomcat, jboss (even for 5.0), websphere (ofcourse dude) and also JOnAS server.
But how come they can leave out glassfish, which is the reference app server for java ee 5?
(I heard that glassfish team has released an eclipse plugin. But i expected more from the number one java ide)
One thing i missed though, is a separate menu item to configure "servers". That's ok.
Then i started churning out a few servlets and jsps in my sample app. I changed the web.xml a few times (to configure servlet init parameters etc)
All was going well until i got an "out of memory exception". The IDE displayed a window which suggested me to close the workspace.
Click the image to enlarge


This is what is i saw in the task manager, when the ide ran out of memory

That was ok with me. I was changing the web app many times and was redeploying it often. Occasionally, i restarted the tomcat server from within eclipse. So i thought that might have overloaded the ide.
I closed eclipse and then started it again. It started up smoothly, but some of the changes i made were not saved. That's ok. But eclipse reported that the tomcat server is "stopped".

Then when i deployed my web app, i got an error which said that

I was quickly able to reckon that tomcat might not have been stopped properly because of the ide crash.
So i attempted to start/restart the server from eclipse, but couldn't.
Then i went to the task manager and closed the tomcat process manually.
I didn't expect this though. I expected the IDE to recognize correctly whether tomcat is running or not and should not ask the user to manually close the process.
After closing the tomcat process i was able to deploy my webapp.
But as time went, eclipse threw more and more such errors, which frustrated me, as i have to go through the process of not only restarting eclipse but also stop the tomcat process manually.
May be, i need to increase the maximum heap space allocated. But whatsoever, i don't want my IDE to crash. It should rather advice me to start the application with increased heap space.
To be honest, i haven't reported this as an issue yet to the eclipse team. I'll be doing that shortly.
I'm sure they can fix these issues quickly and give us an update.
Other things i really appreciate is the nice xml editor, which really save a lot of time. I find the eclipse xml editor marginally better than that of netbeans.
More on the complaints, i feel the code completion needs to be improved for jsp-el and jstl.
I found virtually no code completion for jsp-el.
Also, creating a new servlet is not as easy as creating a jsp, atleast in eclipse.
I need to select various nodes to create a servlet. Eclipse needs improvement here.
So by the current standing, eclipse 3.3 provides good if not great support for java web development. I haven't explored the struts/jsf support in eclipse yet.
Eclipse needs to improve in the web development area, if it want to pose a strong fight to other IDEs out there.
Blogging after a long....break. I was travelling a lot for the last 1 month or so. I went to Singapore, Putrajaya, Malacca to name a few. And as a result, very little time for blogging.
If you are following my blogs, i blogged sometime back about core java development using netbeans 6.0 and eclipse 3.3.
Both are excellent open source IDEs that have their own strength and weakness.
I've been using both netbeans and eclipse and i'm pleased with both of them generally.
Before the advent of version 6.0, netbeans was not on par with eclipse for core java development. The responsive editor, fast code completion, incremental compiling etc, etc.. were some of the trademark eclipse strongholds which netbeans never managed to enter, leave alone capturing.
But with 6.0, netbeans has made really a very huge stride in the areas which where it's traditional letoffs.
Eclipse 3.3 has also made some huge improvements in many areas, like it's support for Java EE 5 development, etc.
I also heard that the WTP project in eclipse has improved a lot over these days, so i thought of giving it a try.
My environment:
Eclipse 3.3 Europa
JDK 1.6.0_03
Tomcat 6.0
So i thought of refreshing my servlet/jsp/jsp-el/jstl skills in the above mentioned environment.
One thing that impressed me is that eclipse, by default, supports many popular application servers/web containers than netbeans does.
There is support for all versions of tomcat, jboss (even for 5.0), websphere (ofcourse dude) and also JOnAS server.
But how come they can leave out glassfish, which is the reference app server for java ee 5?
(I heard that glassfish team has released an eclipse plugin. But i expected more from the number one java ide)
One thing i missed though, is a separate menu item to configure "servers". That's ok.
Then i started churning out a few servlets and jsps in my sample app. I changed the web.xml a few times (to configure servlet init parameters etc)
All was going well until i got an "out of memory exception". The IDE displayed a window which suggested me to close the workspace.
Click the image to enlarge


This is what is i saw in the task manager, when the ide ran out of memory

That was ok with me. I was changing the web app many times and was redeploying it often. Occasionally, i restarted the tomcat server from within eclipse. So i thought that might have overloaded the ide.
I closed eclipse and then started it again. It started up smoothly, but some of the changes i made were not saved. That's ok. But eclipse reported that the tomcat server is "stopped".

Then when i deployed my web app, i got an error which said that
"Several ports (8005, 8080, 8009) required by Tomcat v6.0 Server at localhost are already in use. The server may already be running in another process, or a system process may be using the port. To start this server you will need to stop the other process or change the port number(s).
".

I was quickly able to reckon that tomcat might not have been stopped properly because of the ide crash.
So i attempted to start/restart the server from eclipse, but couldn't.
Then i went to the task manager and closed the tomcat process manually.
I didn't expect this though. I expected the IDE to recognize correctly whether tomcat is running or not and should not ask the user to manually close the process.
After closing the tomcat process i was able to deploy my webapp.
But as time went, eclipse threw more and more such errors, which frustrated me, as i have to go through the process of not only restarting eclipse but also stop the tomcat process manually.
May be, i need to increase the maximum heap space allocated. But whatsoever, i don't want my IDE to crash. It should rather advice me to start the application with increased heap space.
To be honest, i haven't reported this as an issue yet to the eclipse team. I'll be doing that shortly.
I'm sure they can fix these issues quickly and give us an update.
Other things i really appreciate is the nice xml editor, which really save a lot of time. I find the eclipse xml editor marginally better than that of netbeans.
More on the complaints, i feel the code completion needs to be improved for jsp-el and jstl.
I found virtually no code completion for jsp-el.
Also, creating a new servlet is not as easy as creating a jsp, atleast in eclipse.
I need to select various nodes to create a servlet. Eclipse needs improvement here.
So by the current standing, eclipse 3.3 provides good if not great support for java web development. I haven't explored the struts/jsf support in eclipse yet.
Eclipse needs to improve in the web development area, if it want to pose a strong fight to other IDEs out there.
Subscribe to:
Posts (Atom)

