This is my first blog and blogger is really the best tool for beginners who want to create a blog.
But as i blogged more and more, I felt blogger is inadequate to meet my needs and hence I decided to switch here
If you are a blogger user, i recommend you to try wordpress.com to host your blog.
I've a small writeup which might be helpful to you.
Anyway, thanks for reading my blog and providing your valuable comments.
You are most welcome to read my new blog.
Thank you once again.
Friday, March 7, 2008
Tuesday, March 4, 2008
Resize/create windows partitions safely
You are running windows, and you have one or few partitions.
Sometime back, you feel that your "C" drive is running out of space or your "F" drive has simply too much space.
To put it simple, you want to partition your harddisk which is running windows.
Well, there are many free and commercial tools out there which might help your cause. Spell partition and immediately "Partition Magic" will come into your mind. I've used Partition Magic and I must admit that it's a very good tool. It helps you to safely create new partitions, resize existing partitions, delete unwanted partitions etc.
But Partition Magic is an expensive tool which most of us cannot afford. (Atleast for personal use). Is there any alternative for Partition Magic which can safely do all the jobs or atleast some of the jobs that that Partition Magic do?
Well, you need to meet a friend here from unexpected quarters. Yes, it's linux. You might think, "How can linux help me in anyway to partition my hard disk?. I use windows and I don't want to install linux".
The answer is, you can partition your hard disk without disturbing windows and without installing linux.
And your companion here is Ubuntu linux. However you have two options before proceeding further:
- get free ubuntu livecd from ubuntu site
- if you are impatient, download ubuntu for free from ubuntu site and burn it to a cd yourself. (Please follow the instructions about how to write ubuntu "iso" image to a cd from ubuntu website)
Once you have the "live cd" in your hands, partitioning your hard disk is just a matter of inserting the "live cd" into your cd drive!!!
Step 1:
Ubuntu "Live CD" is nothing but a "real" operating system in a cd rom. To use it, you must configure your "boot sequence" (normally by pressing "F2" key when you machine starts). Configure your "boot sequence", so that your system attempts to "boot from cd" first, if there is any bootable cd in your cd drive.
Once you did this, insert the Ubuntu "Live CD" into your cd rom and start your machine. Ubuntu "Live CD" will not boot and will show you a startup screen with some options. Don't worry, select the option "Install Ubuntu in safe graphics mode" and press "enter".
Now you can see a "live" ubuntu desktop. (This might take some time, so please wait.)
Step 2:
Click the menu "System -> Administration -> Partition Editor" from the top most taskbar. This will open the ubuntu partion editor application. Some of you might find it similar to Partition Magic.
Sunday, March 2, 2008
Creating tamil word documents without spending a penny
Last week, one of my church member asked my help to translate an english document to tamil. Eventhough I had no experience in any kind of tamil typing whatsoever, I accepted that offer to try something.
Quite some time back, I blogged about Google transliteration tool which is available online.I thought of trying it for this activity.
Google transliteration helps you to type in english and transliterate into tamil. (Please note that it's not translation).
I did the translation myself with the help of some online english to tamil dictionaries.
And finally, I needed some formatting and suddenly Google Docs came to my mind. What more, Google Docs helps you to even share your online document.
And Google Docs also provides option to export your document into formats like pdf, msword, openoffice etc..
With these tools, you can create decent looking tamil documents.
(Please note that google transliteration uses unicode characters)
Resources:
Google Transliteration
Google Docs
English to Tamil Dictionary
Monday, February 25, 2008
Some basic linux (ubuntu) commands for windows user
1. Create a directory
Windows: mkdir
Linux: mkdir
2. Remove a directory
Windows: rmdir
Linux: rmdir
3. Change to a directory
Windows: cd
Linux: cd
4. Change to a previous directory
Windows: cd..
Linux: cd ..(note one space between "cd" and "..")
5. List content of a directory
Windows: dir
Linux: ls, dir
6. Copy file
Windows: copy
Linux: cp
7. Remove file(s)
Windows: del
Linux: rm
8. Clear the content in command shell
Windows: cls
Linux: clear
9. Display network connection details
Windows: ipconfig
Linux: ifconfig
10. Check connectivity to a machine
Windows: ping
Linux: ping
Note:
The windows os referred here is windows xp
The linux os referred here is ubuntu-7.10
Can you do this in Windows?
Today i happened to use the ubuntu calculator application to do some minor calculation.
I was trying to calculate the size of a file in megabytes.(which i intended to download)
This is what i wanted to calculate:
496890302/(1024*1024)
Normally, in windows, I use to do something like this:
1. Type 496890302
2. Type/press "/"
3. Type 1024
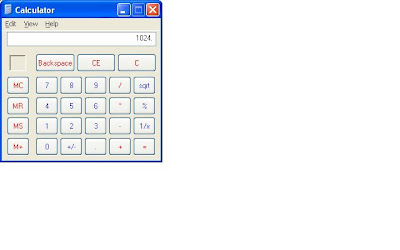
4. Type/press "/"
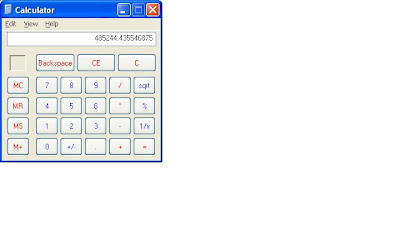
5. Type 1024
6. Type/press "="

Ooohhh...
6 steps for a simple operation....!!
And how about this...?
Step 1:
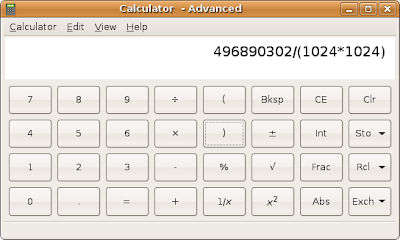
Step 2: Type/press "="

Unknowingly, I've been doing this many times so far in windows. What a waste of time..?
NOTE:
And one more thing..
When you take a screenshot in windows (by pressing alt+printscreen), it's just copied to clipboard. Then you need to open an application like "Paint" or "IrfanView" to save the screenshot to a file. And the default format used by "Paint" (in my case) is "bmp". Because of that, the size of the 4 windows calculator screenshots i posted above is about 2.9 MB.
When you take a screenshot in ubuntu (by pressing alt+printscreen), it prompts you to save the screenshot to a file. And it uses the "png" format to save the screenshots. As a result, the 2 ubuntu-calculator screenshots i posted above are about 45 KB only.
(Yes, it's true that if I save using "png" format in windows by using some good tools like IrfanView, then i can get reduced file size. But in this post, i tried to explain the default behaviour of both operating systems)
Sunday, February 24, 2008
Installing NetBeans 6.0 on Ubuntu-7.10
I followed the instructions mentioned in this NetBeans Wiki to install NB 6.0 on my ubuntu.
But I feel some more information can be added to this wiki.
For example, when i ran the command "
The problem here is that the package sun-java6-jdk is available in the ubuntu "multiverse" repository which is disabled by default.
In ubuntu, the repositories are defined in the file "/etc/apt/sources.list". Take a backup of this file, in case if you want.
Now open this file and uncomment the lines which define the "universe" and "multiverse" respoitories.
It should look something like this now:
The job is not done yet.
Run the command "
The process might take some time. Wait patiently.
Once the update is done, ensure that the "sun-java6-jdk" package is available in the repositories, by issuing the command "
Now we are rest assured that our desired packages are available.
Now run the commmand "
Then just follow the instructions to complete the installation.
In the meanwhile, don't forget to download the "netbeans 6.0" installer from netbeans.org. Once you downloaded the installer, you can run it by navigating to the appropriate folder.
In my case, i needed to issue the following command:
This will invoke the netbeans installer and just follow the instructions to complete the installation process.
That's it, netbeans will install itself smootly on your machine.
But I feel some more information can be added to this wiki.
For example, when i ran the command "
sudo apt-get install sun-java6-jdk", ubuntu complained to me that this package is not found in its repositories.The problem here is that the package sun-java6-jdk is available in the ubuntu "multiverse" repository which is disabled by default.
In ubuntu, the repositories are defined in the file "/etc/apt/sources.list". Take a backup of this file, in case if you want.
Now open this file and uncomment the lines which define the "universe" and "multiverse" respoitories.
It should look something like this now:
# Line commented out by installer because it failed to verify:
deb http://us.archive.ubuntu.com/ubuntu/ gutsy universe
# Line commented out by installer because it failed to verify:
deb-src http://us.archive.ubuntu.com/ubuntu/ gutsy universe
# Line commented out by installer because it failed to verify:
deb http://us.archive.ubuntu.com/ubuntu/ gutsy-updates universe
# Line commented out by installer because it failed to verify:
deb-src http://us.archive.ubuntu.com/ubuntu/ gutsy-updates universe

## N.B. software from this repository is ENTIRELY UNSUPPORTED by the Ubuntu
## team, and may not be under a free licence. Please satisfy yourself as to
## your rights to use the software. Also, please note that software in
## multiverse WILL NOT receive any review or updates from the Ubuntu
## security team.
# Line commented out by installer because it failed to verify:
deb http://us.archive.ubuntu.com/ubuntu/ gutsy multiverse
# Line commented out by installer because it failed to verify:
deb-src http://us.archive.ubuntu.com/ubuntu/ gutsy multiverse
# Line commented out by installer because it failed to verify:
deb http://us.archive.ubuntu.com/ubuntu/ gutsy-updates multiverse
# Line commented out by installer because it failed to verify:
deb-src http://us.archive.ubuntu.com/ubuntu/ gutsy-updates multiverse
The job is not done yet.
Run the command "
sudo apt-get update" in the terminal to instruct ubuntu to update the package details w.r.t the repositories we enabled just now.The process might take some time. Wait patiently.
Once the update is done, ensure that the "sun-java6-jdk" package is available in the repositories, by issuing the command "
apt-cache search sun-java6-jdk". You might get something like this in the terminal window:
james@kuttima-gifty:/etc/apt$ apt-cache search sun-java6-jdk
sun-java6-bin - Sun Java(TM) Runtime Environment (JRE) 6 (architecture dependent files)
sun-java6-jdk - Sun Java(TM) Development Kit (JDK) 6
sun-java6-jre - Sun Java(TM) Runtime Environment (JRE) 6 (architecture independent files)
Now we are rest assured that our desired packages are available.
Now run the commmand "
sudo apt-get install sun-java6-jdk" in the terminal. Depending on your connection speed, this might take quite some time.Then just follow the instructions to complete the installation.
In the meanwhile, don't forget to download the "netbeans 6.0" installer from netbeans.org. Once you downloaded the installer, you can run it by navigating to the appropriate folder.
In my case, i needed to issue the following command:
sudo sh netbeans-6.0.1-ml-javaee-linux.sh
This will invoke the netbeans installer and just follow the instructions to complete the installation process.
That's it, netbeans will install itself smootly on your machine.
Friday, February 22, 2008
Installing VirtualBox guest additions in OpenSuse
I managed to install the VirtualBox guest additions for ubuntu without any problem. And as a result, I get some excellent features like "seamless mouse integration", shared folder access etc, between my host (windows xp) and guest (ubuntu).
But when I tried to do the same for OpenSuse, I got into problem. I couldn't run the VBoxLinuxAdditions.run from the terminal. I received an error messaage saying that "Please install GNU make, Please install GNU compiler".
Then when I searched the web, I found this link quite useful.
As such, I executed this command in the OpenSuse terminal:
It asked for my "root" password, and when i entered, it downloaded the necessary packages. (Though, i received an information that autoconf cannot be installed)
It took nearly 1 hour to download and install the necessary packages on my machine.
Then I ran the command:
after navigating to the appropriate "media" directory.
Then I was notified to restart the OS. And after that, I was able to use all the features I use with "ubuntu" as guest.
I also noticed that my OpenSuse resolution automatically increased to 1024x768 after installing the VirtualBox guest additions. (It was previously 800x600 only)
But when I tried to do the same for OpenSuse, I got into problem. I couldn't run the VBoxLinuxAdditions.run from the terminal. I received an error messaage saying that "Please install GNU make, Please install GNU compiler".
Then when I searched the web, I found this link quite useful.
As such, I executed this command in the OpenSuse terminal:
sudo zypper install gcc make automake autoconf kernel-source
It asked for my "root" password, and when i entered, it downloaded the necessary packages. (Though, i received an information that autoconf cannot be installed)
It took nearly 1 hour to download and install the necessary packages on my machine.
Then I ran the command:
sudo sh VBoxLinuxAdditions.run
after navigating to the appropriate "media" directory.
Then I was notified to restart the OS. And after that, I was able to use all the features I use with "ubuntu" as guest.
I also noticed that my OpenSuse resolution automatically increased to 1024x768 after installing the VirtualBox guest additions. (It was previously 800x600 only)
Subscribe to:
Posts (Atom)

