1. Create a directory
Windows: mkdir
Linux: mkdir
2. Remove a directory
Windows: rmdir
Linux: rmdir
3. Change to a directory
Windows: cd
Linux: cd
4. Change to a previous directory
Windows: cd..
Linux: cd ..(note one space between "cd" and "..")
5. List content of a directory
Windows: dir
Linux: ls, dir
6. Copy file
Windows: copy
Linux: cp
7. Remove file(s)
Windows: del
Linux: rm
8. Clear the content in command shell
Windows: cls
Linux: clear
9. Display network connection details
Windows: ipconfig
Linux: ifconfig
10. Check connectivity to a machine
Windows: ping
Linux: ping
Note:
The windows os referred here is windows xp
The linux os referred here is ubuntu-7.10
Monday, February 25, 2008

Can you do this in Windows?
Today i happened to use the ubuntu calculator application to do some minor calculation.
I was trying to calculate the size of a file in megabytes.(which i intended to download)
This is what i wanted to calculate:
496890302/(1024*1024)
Normally, in windows, I use to do something like this:
1. Type 496890302
2. Type/press "/"
3. Type 1024
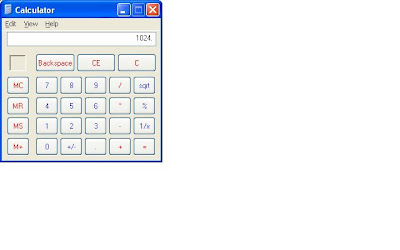
4. Type/press "/"
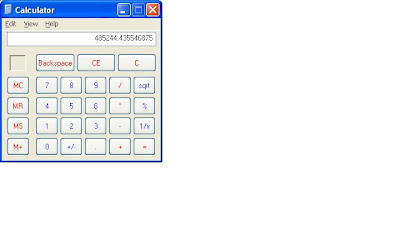
5. Type 1024
6. Type/press "="
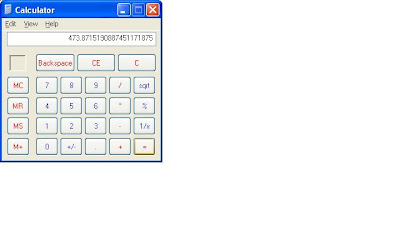
Ooohhh...
6 steps for a simple operation....!!
And how about this...?
Step 1:
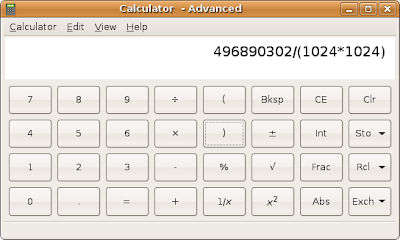
Step 2: Type/press "="

Unknowingly, I've been doing this many times so far in windows. What a waste of time..?
NOTE:
And one more thing..
When you take a screenshot in windows (by pressing alt+printscreen), it's just copied to clipboard. Then you need to open an application like "Paint" or "IrfanView" to save the screenshot to a file. And the default format used by "Paint" (in my case) is "bmp". Because of that, the size of the 4 windows calculator screenshots i posted above is about 2.9 MB.
When you take a screenshot in ubuntu (by pressing alt+printscreen), it prompts you to save the screenshot to a file. And it uses the "png" format to save the screenshots. As a result, the 2 ubuntu-calculator screenshots i posted above are about 45 KB only.
(Yes, it's true that if I save using "png" format in windows by using some good tools like IrfanView, then i can get reduced file size. But in this post, i tried to explain the default behaviour of both operating systems)
I was trying to calculate the size of a file in megabytes.(which i intended to download)
This is what i wanted to calculate:
496890302/(1024*1024)
Normally, in windows, I use to do something like this:
1. Type 496890302
2. Type/press "/"
3. Type 1024

4. Type/press "/"

5. Type 1024
6. Type/press "="

Ooohhh...
6 steps for a simple operation....!!
And how about this...?
Step 1:

Step 2: Type/press "="

Unknowingly, I've been doing this many times so far in windows. What a waste of time..?
NOTE:
And one more thing..
When you take a screenshot in windows (by pressing alt+printscreen), it's just copied to clipboard. Then you need to open an application like "Paint" or "IrfanView" to save the screenshot to a file. And the default format used by "Paint" (in my case) is "bmp". Because of that, the size of the 4 windows calculator screenshots i posted above is about 2.9 MB.
When you take a screenshot in ubuntu (by pressing alt+printscreen), it prompts you to save the screenshot to a file. And it uses the "png" format to save the screenshots. As a result, the 2 ubuntu-calculator screenshots i posted above are about 45 KB only.
(Yes, it's true that if I save using "png" format in windows by using some good tools like IrfanView, then i can get reduced file size. But in this post, i tried to explain the default behaviour of both operating systems)
Sunday, February 24, 2008
Installing NetBeans 6.0 on Ubuntu-7.10
I followed the instructions mentioned in this NetBeans Wiki to install NB 6.0 on my ubuntu.
But I feel some more information can be added to this wiki.
For example, when i ran the command "
The problem here is that the package sun-java6-jdk is available in the ubuntu "multiverse" repository which is disabled by default.
In ubuntu, the repositories are defined in the file "/etc/apt/sources.list". Take a backup of this file, in case if you want.
Now open this file and uncomment the lines which define the "universe" and "multiverse" respoitories.
It should look something like this now:
The job is not done yet.
Run the command "
The process might take some time. Wait patiently.
Once the update is done, ensure that the "sun-java6-jdk" package is available in the repositories, by issuing the command "
Now we are rest assured that our desired packages are available.
Now run the commmand "
Then just follow the instructions to complete the installation.
In the meanwhile, don't forget to download the "netbeans 6.0" installer from netbeans.org. Once you downloaded the installer, you can run it by navigating to the appropriate folder.
In my case, i needed to issue the following command:
This will invoke the netbeans installer and just follow the instructions to complete the installation process.
That's it, netbeans will install itself smootly on your machine.
But I feel some more information can be added to this wiki.
For example, when i ran the command "
sudo apt-get install sun-java6-jdk", ubuntu complained to me that this package is not found in its repositories.The problem here is that the package sun-java6-jdk is available in the ubuntu "multiverse" repository which is disabled by default.
In ubuntu, the repositories are defined in the file "/etc/apt/sources.list". Take a backup of this file, in case if you want.
Now open this file and uncomment the lines which define the "universe" and "multiverse" respoitories.
It should look something like this now:
# Line commented out by installer because it failed to verify:
deb http://us.archive.ubuntu.com/ubuntu/ gutsy universe
# Line commented out by installer because it failed to verify:
deb-src http://us.archive.ubuntu.com/ubuntu/ gutsy universe
# Line commented out by installer because it failed to verify:
deb http://us.archive.ubuntu.com/ubuntu/ gutsy-updates universe
# Line commented out by installer because it failed to verify:
deb-src http://us.archive.ubuntu.com/ubuntu/ gutsy-updates universe

## N.B. software from this repository is ENTIRELY UNSUPPORTED by the Ubuntu
## team, and may not be under a free licence. Please satisfy yourself as to
## your rights to use the software. Also, please note that software in
## multiverse WILL NOT receive any review or updates from the Ubuntu
## security team.
# Line commented out by installer because it failed to verify:
deb http://us.archive.ubuntu.com/ubuntu/ gutsy multiverse
# Line commented out by installer because it failed to verify:
deb-src http://us.archive.ubuntu.com/ubuntu/ gutsy multiverse
# Line commented out by installer because it failed to verify:
deb http://us.archive.ubuntu.com/ubuntu/ gutsy-updates multiverse
# Line commented out by installer because it failed to verify:
deb-src http://us.archive.ubuntu.com/ubuntu/ gutsy-updates multiverse
The job is not done yet.
Run the command "
sudo apt-get update" in the terminal to instruct ubuntu to update the package details w.r.t the repositories we enabled just now.The process might take some time. Wait patiently.
Once the update is done, ensure that the "sun-java6-jdk" package is available in the repositories, by issuing the command "
apt-cache search sun-java6-jdk". You might get something like this in the terminal window:
james@kuttima-gifty:/etc/apt$ apt-cache search sun-java6-jdk
sun-java6-bin - Sun Java(TM) Runtime Environment (JRE) 6 (architecture dependent files)
sun-java6-jdk - Sun Java(TM) Development Kit (JDK) 6
sun-java6-jre - Sun Java(TM) Runtime Environment (JRE) 6 (architecture independent files)
Now we are rest assured that our desired packages are available.
Now run the commmand "
sudo apt-get install sun-java6-jdk" in the terminal. Depending on your connection speed, this might take quite some time.Then just follow the instructions to complete the installation.
In the meanwhile, don't forget to download the "netbeans 6.0" installer from netbeans.org. Once you downloaded the installer, you can run it by navigating to the appropriate folder.
In my case, i needed to issue the following command:
sudo sh netbeans-6.0.1-ml-javaee-linux.sh
This will invoke the netbeans installer and just follow the instructions to complete the installation process.
That's it, netbeans will install itself smootly on your machine.
Friday, February 22, 2008
Installing VirtualBox guest additions in OpenSuse
I managed to install the VirtualBox guest additions for ubuntu without any problem. And as a result, I get some excellent features like "seamless mouse integration", shared folder access etc, between my host (windows xp) and guest (ubuntu).
But when I tried to do the same for OpenSuse, I got into problem. I couldn't run the VBoxLinuxAdditions.run from the terminal. I received an error messaage saying that "Please install GNU make, Please install GNU compiler".
Then when I searched the web, I found this link quite useful.
As such, I executed this command in the OpenSuse terminal:
It asked for my "root" password, and when i entered, it downloaded the necessary packages. (Though, i received an information that autoconf cannot be installed)
It took nearly 1 hour to download and install the necessary packages on my machine.
Then I ran the command:
after navigating to the appropriate "media" directory.
Then I was notified to restart the OS. And after that, I was able to use all the features I use with "ubuntu" as guest.
I also noticed that my OpenSuse resolution automatically increased to 1024x768 after installing the VirtualBox guest additions. (It was previously 800x600 only)
But when I tried to do the same for OpenSuse, I got into problem. I couldn't run the VBoxLinuxAdditions.run from the terminal. I received an error messaage saying that "Please install GNU make, Please install GNU compiler".
Then when I searched the web, I found this link quite useful.
As such, I executed this command in the OpenSuse terminal:
sudo zypper install gcc make automake autoconf kernel-source
It asked for my "root" password, and when i entered, it downloaded the necessary packages. (Though, i received an information that autoconf cannot be installed)
It took nearly 1 hour to download and install the necessary packages on my machine.
Then I ran the command:
sudo sh VBoxLinuxAdditions.run
after navigating to the appropriate "media" directory.
Then I was notified to restart the OS. And after that, I was able to use all the features I use with "ubuntu" as guest.
I also noticed that my OpenSuse resolution automatically increased to 1024x768 after installing the VirtualBox guest additions. (It was previously 800x600 only)
Sharing Windows XP folder with Ubuntu
Since i'm new to ubuntu, all my files were basically residing in windows xp.
As i was working with ubuntu, i thought of relaxing a bit by viewing some photos taken recently. But all of them were sitting inside my xp and i need some way to access it.
Transferring them via usb is an option, but i wanted an even elegant solution. Then i came to know that VirtualBox supports "sharing" folders between "host" and "guest" operating systems.
I read in the VirtualBox manual, that "sharing" folders between "windows" host and "windows" guest is more or less seamless. But "sharing" between "windows" host and "linux" guest need some additional work.
But it's not very tough.
First i needed to configure the shared folder in my VirtualBox. I clicked the menu "Devices->Shared Folders" to configure the sharing. And I choose a folder in my xp machine and gave a share name to that.
Then i opened the terminal in ubuntu and created a directory called share under "mnt" so it looks as "/mnt/share". This required "admin" privileges.
Then i executed the command: sudo mount -t vboxsf myphotos /mnt/share
in the terminal. That's it.
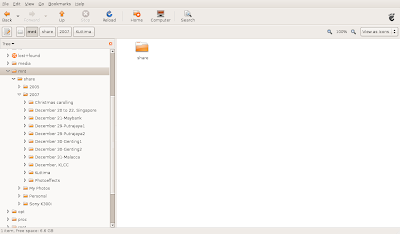
And this how it looked after that in the FileBrowser:
As i was working with ubuntu, i thought of relaxing a bit by viewing some photos taken recently. But all of them were sitting inside my xp and i need some way to access it.
Transferring them via usb is an option, but i wanted an even elegant solution. Then i came to know that VirtualBox supports "sharing" folders between "host" and "guest" operating systems.
I read in the VirtualBox manual, that "sharing" folders between "windows" host and "windows" guest is more or less seamless. But "sharing" between "windows" host and "linux" guest need some additional work.
But it's not very tough.
First i needed to configure the shared folder in my VirtualBox. I clicked the menu "Devices->Shared Folders" to configure the sharing. And I choose a folder in my xp machine and gave a share name to that.
Then i opened the terminal in ubuntu and created a directory called share under "mnt" so it looks as "/mnt/share". This required "admin" privileges.
Then i executed the command: sudo mount -t vboxsf myphotos /mnt/share
in the terminal. That's it.
And this how it looked after that in the FileBrowser:

Best applications in Ubuntu-7.10
Though there are some very good applications integrated in the default ubuntu installation, these are the one which i love most (as of now):
- GParted (Undoubtedly very very good. Extremely powerful. I use the GParted in the ubuntu livecd to resize/partition even my windows xp drives)
- Tomboy notes (Very handy, something like the "Scratchpad" in Google Desktop)
- Calculator (Really amazing, the calculator in windows xp looks very ugly to me now)
- GParted (Undoubtedly very very good. Extremely powerful. I use the GParted in the ubuntu livecd to resize/partition even my windows xp drives)
- Tomboy notes (Very handy, something like the "Scratchpad" in Google Desktop)
- Calculator (Really amazing, the calculator in windows xp looks very ugly to me now)
Increasing the screen resolution of Ubuntu-7.10 on VirtualBox
Oops...finally i managed to configure my ubuntu screen resolution to the fullest.
I have a Dell Vostro 1400 laptop with Windows xp professional. Ubuntu runs on my machine on top of VirtualBox.
But I never enjoyed working with ubuntu, since all i was able to view the ubuntu desktop at the resolution "800x600" only.
After searching through the web, I finally managed to get the full resolution supported by my notebook. (1280x800).
These are steps i followed:
- installed the virtual machine add-ons provided by VirtualBox
- opened the /etc/X11/xorg.conf file and added the the resolutions "1280x800" and "1024x768" under the "Screen" section...
So here is how my xorg.conf file looks now...
----------------------------------------------------------------------------------------------
# xorg.conf (xorg X Window System server configuration file)
#
# This file was generated by dexconf, the Debian X Configuration tool, using
# values from the debconf database.
#
# Edit this file with caution, and see the xorg.conf manual page.
# (Type "man xorg.conf" at the shell prompt.)
#
# This file is automatically updated on xserver-xorg package upgrades *only*
# if it has not been modified since the last upgrade of the xserver-xorg
# package.
#
# If you have edited this file but would like it to be automatically updated
# again, run the following command:
# sudo dpkg-reconfigure -phigh xserver-xorg
Section "Files"
EndSection
Section "InputDevice"
Identifier "Generic Keyboard"
Driver "kbd"
Option "CoreKeyboard"
Option "XkbRules" "xorg"
Option "XkbModel" "pc105"
Option "XkbLayout" "us"
EndSection
Section "InputDevice"
Identifier "Configured Mouse"
Driver "vboxmouse"
Option "CorePointer"
Option "Device" "/dev/input/mice"
Option "Protocol" "ImPS/2"
Option "ZAxisMapping" "4 5"
Option "Emulate3Buttons" "true"
EndSection
Section "InputDevice"
Identifier "Synaptics Touchpad"
Driver "synaptics"
Option "Device" "/dev/psaux"
Option "Protocol" "auto-dev"
Option "HorizEdgeScroll" "0"
EndSection
Section "InputDevice"
Driver "wacom"
Identifier "stylus"
Option "Device" "/dev/input/wacom"
Option "Type" "stylus"
Option "ForceDevice" "ISDV4" # Tablet PC ONLY
EndSection
Section "InputDevice"
Driver "wacom"
Identifier "eraser"
Option "Device" "/dev/input/wacom"
Option "Type" "eraser"
Option "ForceDevice" "ISDV4" # Tablet PC ONLY
EndSection
Section "InputDevice"
Driver "wacom"
Identifier "cursor"
Option "Device" "/dev/input/wacom"
Option "Type" "cursor"
Option "ForceDevice" "ISDV4" # Tablet PC ONLY
EndSection
Section "Device"
Identifier "Generic Video Card"
Driver "vboxvideo"
BusID "PCI:0:2:0"
EndSection
Section "Monitor"
Identifier "Generic Monitor"
Option "DPMS"
EndSection
Section "Screen"
Identifier "Default Screen"
Device "Generic Video Card"
Monitor "Generic Monitor"
DefaultDepth 24
SubSection "Display"
Modes "1280x800" "1024x768" "800x600"
EndSubSection
EndSection
Section "ServerLayout"
Identifier "Default Layout"
Screen "Default Screen"
InputDevice "Generic Keyboard"
InputDevice "Configured Mouse"
# Uncomment if you have a wacom tablet
# InputDevice "stylus" "SendCoreEvents"
# InputDevice "cursor" "SendCoreEvents"
# InputDevice "eraser" "SendCoreEvents"
InputDevice "Synaptics Touchpad"
EndSection
-------------------------------------------------------------------------------------------
And the only change i made was here:
Section "Screen"
Identifier "Default Screen"
Device "Generic Video Card"
Monitor "Generic Monitor"
DefaultDepth 24
SubSection "Display"
Modes "1280x800" "1024x768" "800x600"
EndSubSection
EndSection
I just added "1280x800" "1024x768" under the SubSection "Display".
Fortunately this worked for me.
(Note: I actually got this information from a VirtualBox forum thread and I sincerely thank the guy who provided this information. Thank you very much really)
Whatmore, if you choose the "Full screen mode" in VirtualBox, you get a feeling of just running ubuntu...
Ya, now i feel, i can slowly leave behind windows xp behind me...
I have a Dell Vostro 1400 laptop with Windows xp professional. Ubuntu runs on my machine on top of VirtualBox.
But I never enjoyed working with ubuntu, since all i was able to view the ubuntu desktop at the resolution "800x600" only.
After searching through the web, I finally managed to get the full resolution supported by my notebook. (1280x800).
These are steps i followed:
- installed the virtual machine add-ons provided by VirtualBox
- opened the /etc/X11/xorg.conf file and added the the resolutions "1280x800" and "1024x768" under the "Screen" section...
So here is how my xorg.conf file looks now...
----------------------------------------------------------------------------------------------
# xorg.conf (xorg X Window System server configuration file)
#
# This file was generated by dexconf, the Debian X Configuration tool, using
# values from the debconf database.
#
# Edit this file with caution, and see the xorg.conf manual page.
# (Type "man xorg.conf" at the shell prompt.)
#
# This file is automatically updated on xserver-xorg package upgrades *only*
# if it has not been modified since the last upgrade of the xserver-xorg
# package.
#
# If you have edited this file but would like it to be automatically updated
# again, run the following command:
# sudo dpkg-reconfigure -phigh xserver-xorg
Section "Files"
EndSection
Section "InputDevice"
Identifier "Generic Keyboard"
Driver "kbd"
Option "CoreKeyboard"
Option "XkbRules" "xorg"
Option "XkbModel" "pc105"
Option "XkbLayout" "us"
EndSection
Section "InputDevice"
Identifier "Configured Mouse"
Driver "vboxmouse"
Option "CorePointer"
Option "Device" "/dev/input/mice"
Option "Protocol" "ImPS/2"
Option "ZAxisMapping" "4 5"
Option "Emulate3Buttons" "true"
EndSection
Section "InputDevice"
Identifier "Synaptics Touchpad"
Driver "synaptics"
Option "Device" "/dev/psaux"
Option "Protocol" "auto-dev"
Option "HorizEdgeScroll" "0"
EndSection
Section "InputDevice"
Driver "wacom"
Identifier "stylus"
Option "Device" "/dev/input/wacom"
Option "Type" "stylus"
Option "ForceDevice" "ISDV4" # Tablet PC ONLY
EndSection
Section "InputDevice"
Driver "wacom"
Identifier "eraser"
Option "Device" "/dev/input/wacom"
Option "Type" "eraser"
Option "ForceDevice" "ISDV4" # Tablet PC ONLY
EndSection
Section "InputDevice"
Driver "wacom"
Identifier "cursor"
Option "Device" "/dev/input/wacom"
Option "Type" "cursor"
Option "ForceDevice" "ISDV4" # Tablet PC ONLY
EndSection
Section "Device"
Identifier "Generic Video Card"
Driver "vboxvideo"
BusID "PCI:0:2:0"
EndSection
Section "Monitor"
Identifier "Generic Monitor"
Option "DPMS"
EndSection
Section "Screen"
Identifier "Default Screen"
Device "Generic Video Card"
Monitor "Generic Monitor"
DefaultDepth 24
SubSection "Display"
Modes "1280x800" "1024x768" "800x600"
EndSubSection
EndSection
Section "ServerLayout"
Identifier "Default Layout"
Screen "Default Screen"
InputDevice "Generic Keyboard"
InputDevice "Configured Mouse"
# Uncomment if you have a wacom tablet
# InputDevice "stylus" "SendCoreEvents"
# InputDevice "cursor" "SendCoreEvents"
# InputDevice "eraser" "SendCoreEvents"
InputDevice "Synaptics Touchpad"
EndSection
-------------------------------------------------------------------------------------------
And the only change i made was here:
Section "Screen"
Identifier "Default Screen"
Device "Generic Video Card"
Monitor "Generic Monitor"
DefaultDepth 24
SubSection "Display"
Modes "1280x800" "1024x768" "800x600"
EndSubSection
EndSection
I just added "1280x800" "1024x768" under the SubSection "Display".
Fortunately this worked for me.
(Note: I actually got this information from a VirtualBox forum thread and I sincerely thank the guy who provided this information. Thank you very much really)
Whatmore, if you choose the "Full screen mode" in VirtualBox, you get a feeling of just running ubuntu...
Ya, now i feel, i can slowly leave behind windows xp behind me...
Subscribe to:
Posts (Atom)

 Posts
Posts

